![H-Teal (1).svg]](https://help.occupier.com/hubfs/H-Teal%20(1).svg)
Watch how to set up a Scheduled SFTP Export

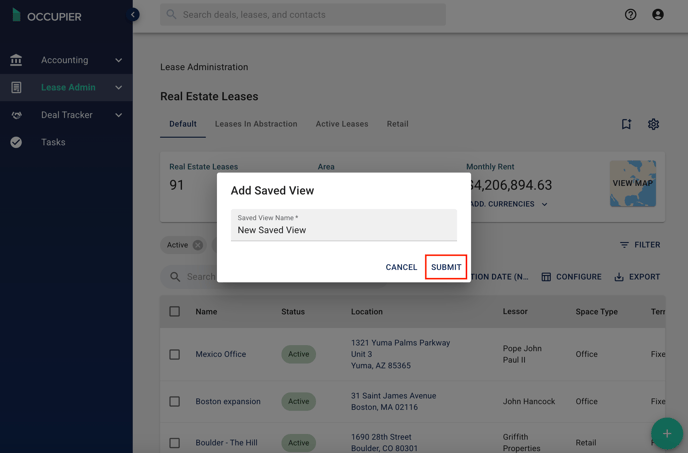
Step 1: Creating A Saved View
Scheduled exports in Occupier are powered by saved views, so the first step is to create a saved view that defines the data you want to export.
How to Create a New Saved View
Follow these easy steps to create a personalized, reusable view of your lease data:
Navigate to the Lease Admin Dashboard.
- Apply filters to narrow your results and "Submit".
- Configure the table headers to hide or show exactly the information you need and reorder the columns and "Submit".

Save Your Customized View:
- Click on the Bookmark Icon located in the top-right corner of your page.

Name and Submit Your View:
- Provide a clear and descriptive name. (Important: Saved Views are shared across your account. Choose a name easily recognizable by other users.)
- Click "Submit" to save your view.
Learn more about Occupier saved views here.
Step 2: Scheduling the Export
Now that you have created your Saved View, you are ready to set up your scheduled export.
First, navigate to your settings as shown below -

The next step will be to configure a delivery method. Within your settings, click on the "Delivery Methods" menu item and then click "Add Delivery Method"

From here you will need to name the configuration and populate the required fields. This part would typically be completed by someone on your internal IT department.
Once the required fields have been populated, the connection can be tested.

Once the delivery method has been configured, you are ready for the final step: scheduling your export. Within your settings, click on the "Scheduled Exports" menu item and click the "Schedule Export" button

Lastly, choose which report you want to schedule, the format (Xlsx or Csv), the saved view you created, and then the delivery cadence. Lastly, for an SFTP export, you'll want to make sure you chose the delivery method you configured earlier and this is also where you can specify a destination folder.
Once you have finished, click the "Schedule Export" button and you are all set!
