![H-Teal (1).svg]](https://help.occupier.com/hubfs/H-Teal%20(1).svg)
Prerequisites
The setup steps in NetSuite must be completed by a user with Administrator permissions in your company's NetSuite instance.
Turn on NetSuite features
Enable Web Services and Token-based authentication in your NetSuite account.
- In your NetSuite account, navigate to Setup > Company > Enable Features.
- In the Enable features section, confirm the below features are enabled:
- Under Analytics, enable Suiteanalyticsworkbook.
- Under SuiteCloud, enable:
- Soap web services
- REST web services
- Token-based authentication


Install the Occupier sync bundle
Our bundle will create a role with the required permissions to use the integration.
Open the “Occupier Sync Bundle“ link:
Click Install.
Note: Installing the bundle may take up to 5 minutes. When the bundle is installed, there will be a green check in the status column.
If you are unable to install the bundle, manually create the role using the list of permissions provided at the end of this page.
Create an Integration
Once the role is set up, you can follow these steps to generate the consumer Key & Secret:
- Go to Setup > Integrations > Manage integrations.
- Click the 'New' button to create a new integration.
Name: Enter a meaningful name (for example, Occupier Integration)
Authentication: Under the 'Authentication' section,- Check Token-Based Authentication.
- Uncheck TBA: Authorization flow
Oauth 2.0: Under the Oauth 2.0 section,- Uncheck Authorization Code grant
- Click the 'Save' button to save the changes.


Make sure to copy both the 1) "Consumer Key" and 2) "Consumer Secret" before leaving this screen, as you will not be able to retrieve this information later.

Assign a user to the role
It is advisable to create a dedicated user or an "integration role" for this purpose rather than assigning the role to an existing user. This approach enhances tracking and auditing operations, facilitating seamless data exchange between various platforms while ensuring access is limited to only the essential information and functions necessary for the integration. Essentially, it functions as a specialized user account with restricted permissions, specifically designed to support integration tasks.
- Click Lists > Employees > New
- Enter the employee details (e.g. Integration User), and email address.
- Click Access tab
- select Give Access.
- Enable Manually Assign or Change Password and specify a password.
- Under Roles, select Occupier Sync Role (role imported with the bundle) and click Add.


Custom Segment permissions
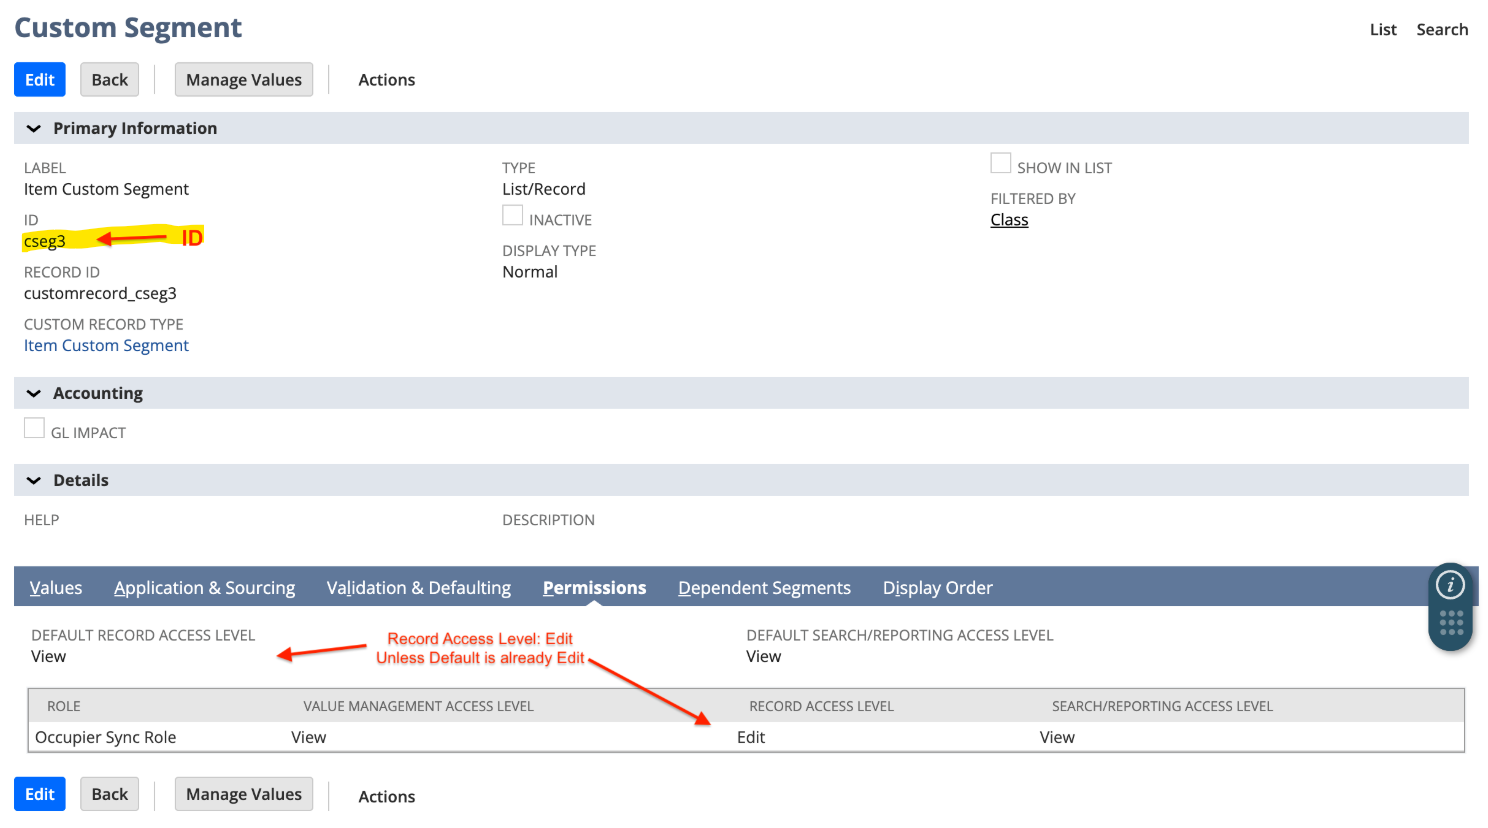
To include custom segments in the integration, make sure the "Occupier Sync Role" has the "Record Access Level" permission set to "Edit" or higher.
Important: This integration is compatible solely with "Transaction Columns" custom segments for Journal Entry line items. If you have not yet created your custom segment, please consult the official NetSuite documentation for detailed instructions on how to do so.
- Go to Customization > List, Records, & Fields > Custom Segments

- Find the custom segment you want to use and click
Edit - In the Permissions section, ensure the assigned role has "Edit" access under "Record Access Level" or set "Default Record Access Level" to "Edit" or higher
- Locate and copy the segment ID (the value starting with
cseg).- Provide this ID to Occupier Support, including the corresponding Segment Type in Occupier Settings for mapping purposes. The Occupier team will handle this mapping process.
Create Access tokens
Create a new Access Token for the user and role created:
- Go to Setup > Users/Roles > Access Tokens.

- Click the 'New' button to create a new Access token
- Complete the form
- Select the "Application name": Occupier Integration
- Select the "User", which we created in the previous steps (e.g. Integration User)
- Give the token a recognizable "token name"
- Click the 'Save' button to save the changes.

Once saved, the Account Token ID and Secret will be generated.
Copy the "Token Id" and the "Token secret". You can not access this information once you exit this screen.

Finding your NetSuite Account ID
- This is the combination of letters or numbers before "app.netsuite.com" of the URL
- If your URL is "https://7600508.app.netsuite.com...", your NetSuite Account ID is 7600508
Occupier Settings
This step requires an Occupier user with access to manage integration settings.
To add the Manage Integration Settings to a user, the Occupier Admin should select "Allow managing integration settings?" button. To maintain security and controls, it is advisable to avoid granting lease accounting access to any user who has permissions to manage integration settings.
- Open https://app.occupier.com/settings/integrations
- Click on the toggle for NetSuite

- Enter the credentials obtained in the previous steps.
- Account ID: Alphanumeric prefix on your NetSuite URL
- Consumer Key: Confirmation screen after creating the integration
- Consumer Secret: Confirmation screen after creating the integration
- Token ID: Confirmation screen after creating your Access Token
- Token Secret: Confirmation screen after creating your Access Token
- Click Save

Appendix: Creating the role manually
- Go to Setup > Users/Roles > Manage Roles.
- Click on the 'New' button to create a new role.
- Give the role a name (e.g. Occupier Sync Role).
- Under 'Authentication', enable: 'Web Services Only Role'
- Under the 'Permissions' tab, select the appropriate permissions for this role.
- Transactions:
- Find Transaction: Full
- Journal Approval: Create
- Make Journal Entry: Edit

- Reports:
- SuiteAnalytics Workbook: Edit

- Lists:
- Access to transaction numbering audit log: View
- Accounts: View
- Classes: View
- Currency: View
- Departments: View
- Documents and Files: View
- Locations: View
- Subsidiaries: View

- Setup:
- Access Token Management: Full
- Company Information: Full
- Custom Transaction Fields: View
- Manage Accounting Periods: View
- REST Web Services: Full
- SOAP Web Services: Full
- User Access Tokens: Full
